
... From the bench
hot summer days & hotter cars! 8-21-21
 Hot cars, hot boats, & hot attics are all dangerous places to store bamboo rods. Park in the shade, & while driving keep rods out of the sun.
This weekend I picked up 2 vintage Allcock sea trout rods, & a delicate T&T 8 ft graphite. Leaving the estate buyers', I placed the rods next to me on the front seat parked in the sun. Thinking the cab would cool off when I started driving, I didn't worry about the rods (or the black T&T tube).
Minutes later the rods were still in the sun, so I reached over to pull them into the shade, & almost burned my hand on the black rod tube! Well, don't do that again! I figured the rod inside was probably not hot yet, after just a few minutes in the sun. Opening the tube, I pulled out a very hot T&T graphite! Luckily, the bamboo sea trout rods in their original heavy canvas bags were just warm... It is important to keep rods out of the hot sun.
Minutes later the rods were still in the sun, so I reached over to pull them into the shade, & almost burned my hand on the black rod tube! Well, don't do that again! I figured the rod inside was probably not hot yet, after just a few minutes in the sun. Opening the tube, I pulled out a very hot T&T graphite! Luckily, the bamboo sea trout rods in their original heavy canvas bags were just warm... It is important to keep rods out of the hot sun.
shooting ferrules ~ "scene of the crime" at the rod bench! 8-08-21
|
Trouble pulling Phillipson ferrules is nothing new. Today, getting ready for another struggle, I had the ferrule puller clamped in place & began to heat the ferrule over the alcohol burner. Rotating it to make sure I heated it evenly on all sides, I must have heated it a little too long --- BAMM!!! I've heard of ferrules firing off the blank, but had it happen only with very small ni-silver tip tops, which occasionally whizzed across the room w/ just a little heating...
I heard the ferrule hit something over by the winding table, then clatter around on the floor amid boxes of components. (Now I understand why Dwight Lyons suggested making a padded box to catch the ferrule!) A new home protection device? Now, I'm wondering if like a rifle, longer rod sections would give more muzzle velocity & accuracy to the shot...? :-) |

Phillipson ferrule not the worse for wear after the "shot". It cleaned up nicely, and is now installed on a replacement tip section.
|
more loose ferrules, 7-5-20
 High quality skirted, rolled-welt ferrule pulled from 1930's Montague Rapidan w/ traces of powdered glue. Note: Nickel Silver pin visible in ferrule station.
It's now de-rigeur for me to suspect loose ferrules on older rods coming into the shop. After recently handing off a 1930's Montague Rapidan following replacement of several guide wraps, I heard what had become a dreaded refrain, "the ferrule is loose!" -- Which ferrule? I had previously checked the ferrules & inspected the ferrule wraps, all seeming in order. I gathered the rod back, assembled & flexed it in several directions. It seemed solid. Putting pressure on the butt ferrule, I found it was tight to the cane in every direction except one.
Removing the wrap & setting the pin, I pulled the ferrule. Lately I have had inconsistent success w/ Montague's advice to 'heat the ferrule over a flame to re-set the glue''. A quick look at the ferrule station told the story - only traces of old powdered glue remaining... After light sanding of mating surfaces, new ferrule cement was used to reset the ferrule. After replacing the ferrule wrap & coating w/ sealer & varnish, a casting test showed the rod was again solid, ready for the water...
Removing the wrap & setting the pin, I pulled the ferrule. Lately I have had inconsistent success w/ Montague's advice to 'heat the ferrule over a flame to re-set the glue''. A quick look at the ferrule station told the story - only traces of old powdered glue remaining... After light sanding of mating surfaces, new ferrule cement was used to reset the ferrule. After replacing the ferrule wrap & coating w/ sealer & varnish, a casting test showed the rod was again solid, ready for the water...
violins & bamboo rods - Part I 5-21-20
|
In a recent concert broadcast on NPR of a well known symphony orchestra, the violin soloist was playing a 1715 Guarneri violin.
Violins may be a lot like bamboo rods, w/ those made by early masters valued for their exquisite design, fine craftsmanship, & rich tone. Both are handmade, have wood, fiber & fine metal components, & are coated w/ proprietary varnish. And just as a 300 year old Guarneri gives its resounding tones during a musical performance, a 100 year old bamboo fly rod lifts the fly line, send it back & then forward again in graceful & accurate arcs. Many sought after & highly valued rods (older Leonard's, Payne's, Edwards', etc) are now nearly 100 years old, & later rods (Dickerson, Garrison, Gillum, Paul Young, etc) are nearing 75 years. Many of these rods continue to be used on the water. While A.J. Campbell [1997] says, "a Payne in pristine shape is really too good to take fishing", 'Gentleman Jim' would beg to disagree, always maintaining that his rods were made to be fished. violins & bamboo rods - Part II 5-25-20
|

Violin made by Bartolomeo Giuseppe Guarneri, 1698-1744
|
Before I began restoring bamboo rods, I spent 5 years restoring vintage ukulele's. After finishing a work assignment, I would race to the area's premier stringed instrument shop, hoping to make it in time to spend the last hour standing behind the experienced luthier while he worked. I was all eyes & questions, while I watched him manipulate the parts of fine guitars, mandolins, & ukuleles. Some ukulele's I later worked on were nearing 100 years old, & the practices I learned prepared me well for my later work w/ bamboo rods.
Although violins share many of the characteristics of the other instruments, they exist in a rarified realm of their own. Thinking I had 5 years of ukuleles under my belt, I once asked a violin shop owner if he could give me a 'quick 5 minute explanation' of the field of fine violins. He curtly replied, "There is no 5 minute version". So much for short cuts!
One of the first precepts I learned about working on violins was: Have in mind the next person who will work on the instrument. Counter-intuitive as this idea may seem, this approach most respects the original instrument. Practically speaking, this means using methods & materials which will not harm the integrity of the original instrument, nor cause the next person who works on it to have greater problems doing their work.
...to be continued
more loose ferrules on vintage rods, 5-19-20
Heddon #10, 2F, 8-1/2 ft, ca 1940's in recent "Before & After" section looked 'good to go' as I took it out for test casting prior to sending it off to it's eagerly waiting owner. I was pleased to find the rod cast a DT6F w/ authority & smoothness. Continuing to cast just for the pleasure of it, I thought maybe the line /leader had snagged a tuft of grass, or knotted, as the line ceased to flow as smoothly as before. I checked for snags but found none. I removed the line from the rod & flexed it & felt a faint looseness somewhere. I examined each ferrule & found w/ some pressure I could move each female ferrule just a little.
Disappointed, I went to the alcohol lamp & gently heated each female ferrule, hoping to re-set the adhesive. After giving time to cool & set, I assembled the rod & gave it the usual flex - the clicks were still there! So, back to the bench for pin removal, re-glue & rewrap!
Disappointed, I went to the alcohol lamp & gently heated each female ferrule, hoping to re-set the adhesive. After giving time to cool & set, I assembled the rod & gave it the usual flex - the clicks were still there! So, back to the bench for pin removal, re-glue & rewrap!
late summer "bamboo" 8-31-19
 Thanks very much ............................. I think!
I always loved the photo on p. 28 of Dan Homel's wonderful guide to Antique & Collectible Fishing Rods. It shows a garbage can at a garage sale filled with bamboo rods. Homel's caption reads: "A bundle of bamboo fishing rods at a garage sale. Does anything decent lurk amongst this pile of junk? You never know!"
Early Saturday afternoon a good friend called to say he was coming over with some bamboo. I asked him, "what bamboo", & he repeated, "some bamboo". After seeing a rod owner off, I heard my friend's van coming up the driveway. When he opened the back doors of the van, I must have gaped and sputtered... An hour later we had moved most of the "bamboo" into the shop.
Late the next morning, as I was making coffee, I glanced out my window to see two Hardy fly reels sitting on the porch railing. Puzzled & not remembering leaving them there the day before, I opened the door. My friend had arrived again an hour earlier, neatly stacked a 2nd load of "bamboo" against the back steps, & quietly departed without waking me. As I drank my coffee, I ran my hands over the two reels he had left... M F
later summer, tomato stakes? 9-17-19

Whoops... maybe I should pull off that ferrule?
|
I had always smiled when someone mentioned using old bamboo rod sections for tomato stakes. I considered it one of the good jokes about bamboo rods, but thought the actual practice would be travesty.
...But this summer when the tomato plants out back were outgrowing their few supports, I paused & thought hmm .... |
loose ferrules on vintage rods, 8-15-19
More & more vintage bamboo rods are coming to my bench with ferrules which are loose on the cane. It could be the heat & dryness of the summer, but maybe these rods are just getting older, with more time for the old glues to harden, crystalize, or just dry out... (How vintage rods have been stored over the years can be a big factor.)
Sometimes judiciously heating the ferrule over an alcohol lamp will re-melt the glue, & when it hardens, the ferrule is again tight -- at least for a while. I recently did this with success on a 1920's 7-1/2 ft Montague 6-section 'valise rod'. Good thing! With its short 16-inch sections, it wouldn't be too much of an exaggeration to say this rod IS all ferrules (& all pinned besides)!
This is not a new idea. In the No. 39 Montague Rod & Reel Catalog (1939), a section entitled "A Good Rod Deserves Good Care" suggests: 'A loosened ferrule generally can be tightened by heating it by holding over a burning match, there generally being sufficient cement in the ferrule.'
On other rods of similar or even later vintage, this doesn't always work. This was true on 2 out of 3 - 1950's era Japanese rods recently restored. When the loose ferrules were finally removed for re-setting, there was only a little 'dust' on the ferrule stations. No wonder heating them didn't do much good!
Addendum (5-20): Heddon #10, 2F, 8-1/2 ft in recent "Before & After" section looked 'good to go' as I took it out back for test casting prior to sending it off to it's eagerly waiting owner. I was pleased to find the rod cast a DT6F w/ authority & smoothness. Continuing to cast just for the pleasure of it, I thought maybe the line/leader had snagged a tuft of grass, as the line ceased to flow as smoothly as before. I checked for snags but found none. I then removed the line from the rod & flexed it as in a cast & felt a faint looseness somewhere. I examined each ferrule & found w/ some pressure I could move each female ferrule just enough to create a click. Disappointed, I went to the alcohol lamp & gently heated each female ferrule, hoping to re-set the adhesive. After giving time to cool & set, I assembled the rod & gave it the usual flex --- the clicks were still there... (... back to the bench for re-glue & rewrap!)
(more text & photos to come)....
casting performance w/ vintage tip tops, 11-23-18
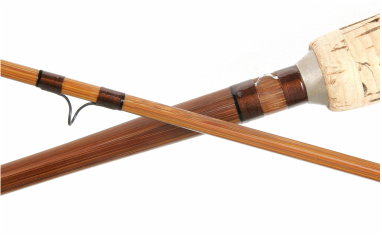
Recent repair of the fractured tip of a vintage FE Thomas fly rod led to closely examining its original tip top. Casting the rod after repair led to interesting conclusions about the effects of tip top style & size on casting performance.
The small ring top on the 9 ft FE Thomas (upper rod) measures 3 mm (ID); I reasoned the small ring top would prevent good line shooting with a modern DT6F line (SA). Much to my surprise, the rod test casted very well out to 50+ feet & at that distance allowed shooting 10 feet of line with ease (without even a single haul).
The 8-1/2 ft FE Thomas (lower rod) with its larger 4 mm ring top also casts smoothly to 50 - 60 ft & shoots well with the modern DT5F line (Orvis), which balances this rod.
Accepted wisdom is that efficient casting & line shooting with a fly rod depends to a great degree on Guide Size, especially the diameter of the stripping guide, the size of the snake guides, as well as tip top size & shape.
Stripping guides (original) on these rods were 5 mm ID (9 ft) ; 4-1/4 mm ID (8-1/2 ft) , & snake guides (English twist) were small, approx 1/0 to 2/0, on both rods. Out to "normal" fishing distances of 35 to 50 feet with modern Double Taper 5 & 6 wt lines, both rods performed beautifully! M F
|
**Anecdote: A local rod builder/restorer tells of fitting a fly rod with large spinning guides & tip top, & taking it to his local Northwest river. All his fishing friends were able to cast farther with this so-equipped rod. When asked if they would put these guides on their favorite fly rod, they each answered,"No". |

Top: FE Thomas Dirigo, 9 ft, 1931;
Bottom: FE Thomas Special, 8-1/2 ft, 1932. [Note: due to closer-to-lens position of bottom rod, cane and ferrule diameters appear somewhat larger than actual size.]
|
"as original" - agate stripping guides, 5-11-18
In a true "restoration" rod components should always be "as original". This applies to stripping guides, snake guides & tip tops, as well as ferrules, reel seat, etc. In the early 1900's thru the 1940's, better models from many bamboo rod makers were equipped with fine agate strippers. Lesser models often had blackened steel, tungsten, stainless, hard chrome, or sometimes lower quality "agatine" or "garnet" strippers.
Some authorities have stated agates were sized by their Inside diameter of the agate ring, measured in millimeters, as they are with currently manufactured agate guides. Sometimes, however, vintage agate guides were sized by their Outside diameters.
Some authorities have stated agates were sized by their Inside diameter of the agate ring, measured in millimeters, as they are with currently manufactured agate guides. Sometimes, however, vintage agate guides were sized by their Outside diameters.

Six vintage agate stripping guides are shown with OD's (including nickel silver ring) above & ID's below. A quick scan of the guide sizes shows the relation between Inside & Outside diameters is quite variable. The 2nd, 3rd, & 6th guides (from left) show the largest inside diameters for their overall size; in contrast the 1st & 5th guides have the smallest openings for their overall size. Another useful comparison is to look at the 6th guide compared to the 3rd & 4th agates. This diminutive 6th guide has an opening almost as large as the other two bulky agates. This smaller agate guide would be a much better choice for restoring a light weight older vintage fly rod, especially if that rod were going to be fished.
... I am currently restoring an original 8-1/2 ft Cross fly rod, as well as another original 9 ft Cross (photos to come). These two rods appear to have been made within a year or two of each other. (The Cross Rod Co. operated independently from 1919 to 1925, with rodmaking supervised by Wes Jordan, after which it was purchased by South Bend.) The 8-1/2 ft Cross was missing the stripping guide when I received it, but the 9 ft Cross still had its original agate stripper. Remarkably, the Cross's small agate guide is almost identical in size & shape to the 6th agate guide shown above, w/ OD at 7 mm, and ID at 4-1/2 mm. ... more to come
... I am currently restoring an original 8-1/2 ft Cross fly rod, as well as another original 9 ft Cross (photos to come). These two rods appear to have been made within a year or two of each other. (The Cross Rod Co. operated independently from 1919 to 1925, with rodmaking supervised by Wes Jordan, after which it was purchased by South Bend.) The 8-1/2 ft Cross was missing the stripping guide when I received it, but the 9 ft Cross still had its original agate stripper. Remarkably, the Cross's small agate guide is almost identical in size & shape to the 6th agate guide shown above, w/ OD at 7 mm, and ID at 4-1/2 mm. ... more to come
"third (or fourth) time's a charm" - wraps, 5-4-18
If we follow Michael Sinclair's only slightly tongue-in-cheek advice, we remember to "only wrap on good days". Should we find ourselves inadvertently wrapping on a "bad" day, we can use his second bit of wisdom " ..You can always cut it off & wrap it again"! I have followed this advice many times, cutting it off & wrapping it again, always glad I did.
It takes some patience & a little finesse to accomplish a continuous hookkeeper wrap. This past winter when re-wrapping this vintage Winchester, I had to cut the hookkeeper wrap off more than two times before I got it right!
It takes some patience & a little finesse to accomplish a continuous hookkeeper wrap. This past winter when re-wrapping this vintage Winchester, I had to cut the hookkeeper wrap off more than two times before I got it right!

Winchester / Armax #7257 - 9 ft, circa 1919-1924, made (or supervised) by E.W. Edwards
|

High quality vintage nickel silver agate stripping guide, suitable for this high quality Winchester rod.
|
Further along in the Winchester project, I re-laminated the second tip section, in preparation for polishing the bamboo & re-wrapping the second tip.

"as original" - tip tops, 5-17-17

Top: Perfection tip top (1930's Cross/ South Bend),
Middle & Bottom: Agate and Ring tip tops (early Edwards trade rod)
|

Original Patent granted for design of Perfection tip top, showing an approximately 45 degree loop angle. Since the pear-shaped loop in the perfection design is elongated along the axis of the rod and line movement, it restricts the flow of line less at any given angle than the theoretical circular loop at left.
|
 Top: First Cross Tip with Agate tip top; Middle: Second Cross Tip with perfection tip top; Bottom: Modern Snake Brand tip top. Note the relative diameters of the tip top loops as well as the angles of each loop.
Following Michael Sinclair's dictum in his landmark Bamboo Rod Restoration Handbook, a true "restoration" should always be "as original". This applies to guides, wraps, varnish, reel seat, ferrules, grip, & more. I have regularly followed this guideline for years, only compromising where proper materials or vintage components were not available.
With guides, for example, it is easy to notice the obvious difference. Doing a true restoration often means using fewer guides on a vintage rod (in their original placements) rather than what might be recommended for a current day fishable fly rod. A true restoration almost certainly means using smaller snakes & a smaller stripping guide. Tip tops are not as often noticed but their effect on casting performance is at least as significant.
The current style of pear-shaped "perfection" tip tops first became available in 1915, & they were quickly adopted by many progressive rod makers. The previous style of soldered ring was functional, but had the unwanted effect of allowing the fly line to become looped or kinked around the tip top. I found this out one evening last summer while fishing my local river with a newly restored early Edwards trade rod. With straight ahead forward & back casts the ring top performed fine. But after a number of rolls & side to side swishes to extend line, I found the line fouled. Yep, the line was looped right there around the ring top! It only took me a minute to realize the significant design improvement represented by the pear-shaped perfection top.
It happens that the second tip of this Edwards trade rod is equipped with a very small agate tip top; I had knowingly left this tip in the car for my first trip with this rod to the river.
So...? Since I plan to continue to fish this elegant little Edwards, do I learn to put up w/ the idiosyncrasies of the original ring top, or do I change it to a vintage perfection top (which Edwards would have switched to not long after this rod was made) - ? And what about the other tip? Do I just let this second tip (with it's original diminutive agate top) sit out, rather than use both tips, alternating tips from trip to trip, as is one recommended practice? Hmm...? At least I still have a little time to mull this over --- since the coming season, for me at least, is still some weeks away... MF
- tip tops, part 2, 6-14-17
Casting a 1920's Cross 8-1/2 footer two days ago changed my perspective on the little agate tip tops. This lovely Cross rod has all original components including small to very small snake guides (1/0 and 2/0, down to 3/0 and 4/0 on the tips). The tip tops are perfection steel on one tip, and a small agate on the other. Since I am restoring this vintage rod "as original" for an owner who wants to fish it, I was out test casting w/ each tip, ready to suggest that using silk lines, it will perform well w/ its original small guides & tip tops.
Casting w/ the perfection tip was pleasant & easy w/ both a 5-1/2 DT restored silk line, & a DT6F modern Scientific Anglers line. Switching to the agate topped tip, I was expecting similar results - but was completely shocked when the silk line would not extend easily during false casting. Even the idea of shooting line was out of the question with this tip. Maybe with the ultra smooth S.A. 6 DT line it would be different? No.
Hmm... It's clearly not just the fragility of the agate tip tops that must be considered when using them - the diameters of the agates clearly play a major part, BUT the angle of their loops must be taken into account as well. (to be continued...) MF
- tip tops, part 3, 6-16-17
Casting the Cross rod got me thinking more about the aspects of tip tops that influence the smooth flow of a fly line through their loops. A little geometry provided some rough figures for the effective diameter of those loops at different tip top loop angles.

Variation in Tip Top Loop Angles
|

Change in Effective Loop Diameter for different Loop Angles.
|
.... more to come...
choosing wrap colors, 6-4-16
 Customer Request Re-wrap, H & I Tonka Queen
When you first start to tie flies, the myriad choices of feathers, hair, fur, wool & tinsel are like a toy chest for constructing all manner of fanciful creations. It usually takes months, & sometimes even years, for new tyers to move away from their first whimsical efforts, & learn to tie the standard patterns...
It's similar when you start to wrap rods. The spools of fine silk (or nylon) - red, yellow, orange, black, brown, & white - not to mention jaspers & space dyes - are all so alluring that almost no color combination looks bad! Much later, as w/ fly tying, you come back with a more experienced eye to look at the old combinations on some of the best older rods. Whether complicated signatures, subdued tipping, or simple but elegant ferrule wraps, most retain an air of
quiet dignity that has held up over the years.
Rod restoration, strictly interpreted, involves carefully matching original wraps, or matching original wrap colors that have changed from years under yellowed varnish, or faded from many days of streamside sun. But occasionally a rod owner asks for different colors, or asks you to choose from among a few colors to finish a rod intended primarily for fishing. When this happens, what at first seems straightforward quickly becomes more complex...
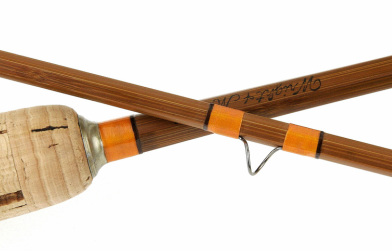 Customer Request Re-wrap, W & M Granger Victory
This 8 ft Wright & McGill Granger Victory originally had orange and black jasper wraps, trimmed with black in the earlier versions. In this case the rod owner liked orange, but did not want to use the original orange and black jasper thread. After viewing test wraps, we settled on medium orange, with medium brown tipping -- after trying out light, medium, dark brown, & black tipping.
MF
MF
saving original wraps, 2-18-16
An old fly rod is a lot like an old fishing camp or hunting cabin that has been in the family for generations. Its nicks, scrapes & rubs trigger our memories of past seasons afield & astream, of fish hooked & caught, or lost, good companionship (or needed time alone), & warm fires at day's end. More & more when I restore a rod, I want to keep those memories intact by preserving at least some original wraps, matching where necessary new silk to the old wraps, & polishing out the original varnish (& touching it up a little where needed to protect the bamboo from moisture)... MF
An old fly rod is a lot like an old fishing camp or hunting cabin that has been in the family for generations. Its nicks, scrapes & rubs trigger our memories of past seasons afield & astream, of fish hooked & caught, or lost, good companionship (or needed time alone), & warm fires at day's end. More & more when I restore a rod, I want to keep those memories intact by preserving at least some original wraps, matching where necessary new silk to the old wraps, & polishing out the original varnish (& touching it up a little where needed to protect the bamboo from moisture)... MF
cleaning cork grips, 2-17-16
 E.W. Edwards Special, 9 ft. (as found)
One of the first things I often do when a rod comes in, after wiping it down w/ a damp cloth, is to clean the cork grip. This ranges from gentle hand rubbing w/ warm water & mild soap (or citrus-based cleaner like "Awesome") to light wiping w/ a fine 3m pad or soft brush, taking care not to gouge or ridge the cork. In more extreme cases of dark staining, goup, or varnish on the grip, a light sanding often uncovers a clean cork surface just below the dirt & stains.
I used to do this cleaning almost automatically, using care but often w/o much forethought. The cork was then blotted & allowed to air dry overnight.
Yesterday I received a 1920's EW Edwards rod, in completely original well-used condition. As I pulled it from the original rod bag bag, I noticed its graceful cigar grip, darkened from many years of use, but not overly dirty. I found I had to clean the oxidized ferrules before I could assemble the rod, & while doing that, I realized I was working out of my usual order ...that's OK, I told myself, I would get around to cleaning the cork in the morning.
As I flexed the close-to-100 year old rod, while gently grasping the old cigar grip, I thought, "Maybe I won't be so quick to clean this one, at least not right away (& I can always do it later). Perhaps by leaving the signs of almost 100 years of honorable use still there under my hand, this rod will continue to look & feel like the venerable 1920's EW Edwards it is....
MF